
Block malicious traffic with fail2ban
 There are many ways in which you can protect your VPS – from strict password policies, through to aggressive spam filtering, basic firewall configurations and antivirus. However, no matter how fancy and elaborate your security precautions are, there will always be someone ready to launch dictionary attacks and probe for vulnerable scripts on your poor server.
Even though we preconfigure strict firewall policies on our fully managed Cloud VPS, there are some services – like the web server itself – that have to remain wide open to the world. Without those gates, there would be no mail flow or web browsing.
Consequently your Cloud VPS can be kept quite busy just fighting off failed FTP/S password probes along with the load of “404 not found” reports in your apache error logs from bots searching for common software exploits. Not to mention the wealth of failed IMAP, SMTP and POP3 connections from spammers and identity thieves trying to compromise your mailbox.
If you weren’t really careful about keeping your website software 100% up to date you have, probably, at some point, received a support ticket from our abuse department notifying you that your VPS has unfortunately become a spam crib due to malware injections or a simple password breach.
A few months ago Parallels (now Odin) introduced new security enhancements to Plesk 12. Such features as WordPress Toolkit, mobile manager application, antispam and antivirus capabilities; the platform is a great choice for any web administrator. One little gem, in terms of security, was the addition of Fail2Ban. Let’s take a look at how it works and how it can save your server from compromise.
Meet fail2ban
Fail2ban is a log processor that uses regular expression (regex) filters to scan log files and perform custom actions once the expressions find matches. For each log file (or set of corresponding log files) fail2ban sets up a jail. Matches that meet the criteria set by you within the module configuration are stopped by the jails.

What does all that mean to you? Well in other words, once an offender tries to access your FTP server and fails to give correct username and/or password after 3 attempts, they are put into a jail (where they belong!) corresponding to the action triggered by their failure.
When a baddy knocks on your port (how fail2ban works)
Filters – the VPS law book
Fail2ban uses a set of filters that match against your logfiles in search of specified patterns (regular expressions) used to detect break-in attempts, password failures, etc.
Here’s the default filter for Plesk admin panel as an example:
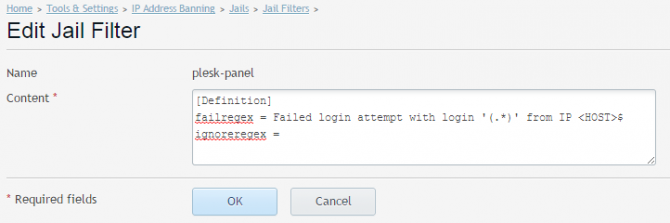
The above failregex matches any set of characters – (.*) – and IP address – <HOST>$ – that match failed authentication log line, e.g.:
[1970-01-01 00:00:01] ERR [panel] [Action Log] Failed login attempt with login 'admin' from IP 0.0.0.0
[1970-01-01 00:00:02] ERR [panel] [Action Log] Failed login attempt with login 'admin' from IP 0.0.0.0
[1970-01-01 00:00:03] ERR [panel] [Action Log] Failed login attempt with login 'admin' from IP 0.0.0.0
Once fail2ban finds a match within a log file, it will perform the action defined for that filter.
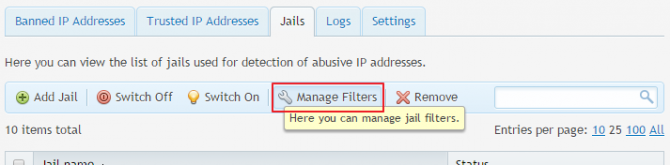
You can create your own filters or modify the existing ones to meet your needs. Filters are managed from the Jail tab area. Just click Manage Filters as shown below.
You can create your own filter by clicking the Add filter icon on the blue stripe. Plesk will redirect you to an empty editor where you can enter your regex search pattern. Just specify a name for the filter and the content (the filter rule).
For example, if you want to set a filter for WordPress failed login attempts, you should put the following in the Content box:
[Definition]
failregex = ^<HOST>.*].*POST .*/wp-login\.php HTTP.*
ignoreregex =
After you’re done, just hit OK and your new filter will be added to the list.
Actions – fail2ban’s secret service
Fail2ban actions are the steps which will be executed once a filter matches. You can think of an action file as a collection of commands. Those range from a firewall block on a given port, to more complex actions like preventing IP access on all ports, sending email with information on the IP or even giving you information with log lines that matched the ban. You can use the following actions, which are already set up in Plesk:
- iptables -to ban IP addresses via iptables firewall, on a single port
- iptables-allports – to ban IP addresses via iptables firewall, on all ports
- iptables-multiport – to ban IP addresses via iptables firewall, on multiple ports
- sendmail – to send email notification via sendmail
Actions can be modified as they’re added to the jail rule. You can add any action you want, or modify defaults.
For example, the default iptables-multiport action looks like this:
iptables-multiport[protocol="tcp", name="default", chain="INPUT", blocktype="REJECT --reject-with icmp-port-unreachable", port="default"]
The particular components of the action are passed through the jail to a firewall service that blocks an IP within the jail’s created chain. Plesk lets you modify the action rules, and I recommend to at least change the name and port from the default for any custom actions (modified or new) to make them easily identifiable.
Fail2ban Jails – send the wildcats where they belong
Fail2ban’s jails are the most important part of the tool. A jail combines exactly one filter with one or more actions. Each jail is edited or created from the Jail tab. Common actions to manipulate the jails are located on the blue strip:
![]()
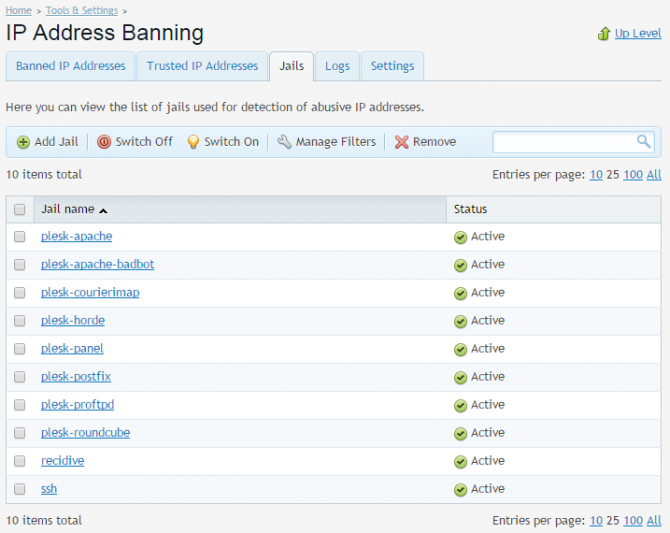
Below this, you should see the default Plesk fail2ban Jails, together with any custom jails that you create.
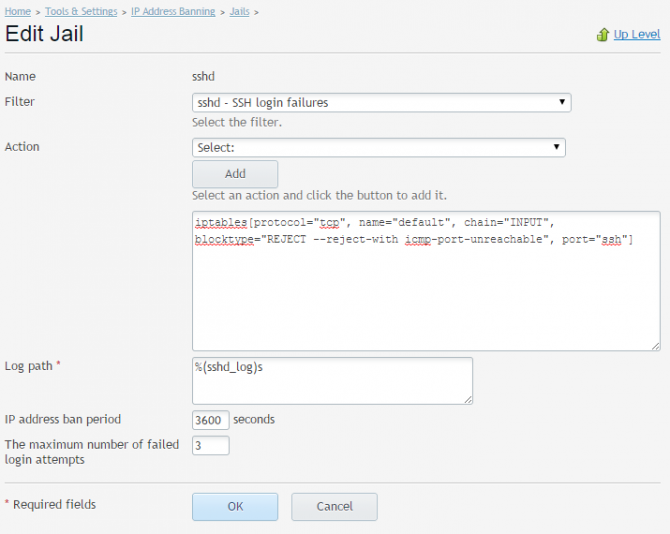
If you want to make changes to a jail, simply click on its name. You will be redirected to jail administration screen detailing its current settings as well as a list of IP addresses currently jailed (banned) by it.
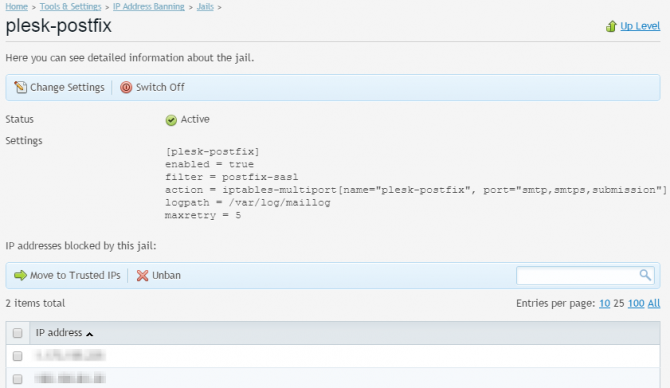
From this level you can edit the jail actions and filter it uses, as well as specify logpath to be scanned, maximum failure attempts for a single IP and ban time.
Modular jail editing makes it fast and easy to specify jail filter and add actions from a list. As mentioned before, Plesk offers only a handful of available actions, however they can be easily edited as once added, they are placed in an editable text area, where you can change all the defaults according to your needs:
Once a jail is created or edited, fail2ban will reload the set of jails to make sure any changes won’t go unnoticed.
The setup
As this is a new feature, we don’t currently enable it by default – but don’t worry, Fail2ban Plesk module configuration is fairly easy. To enable fail2ban module, enter the module configuration area and tick ‘Enable intrusion detection‘ under the ‘Settings‘ tab.
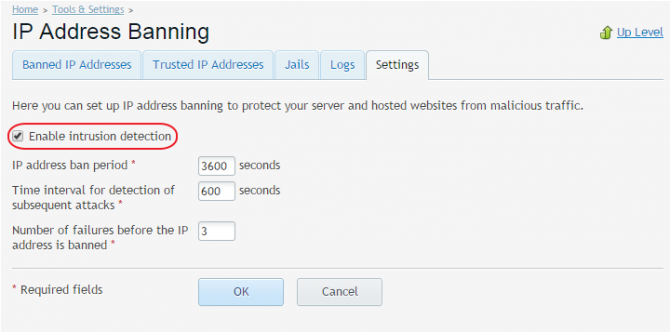
Once that’s done, the fail2ban daemon will start running on your system. The other settings that can be defined here, are the fail2ban defaults:
- IP address ban period – the default time for which an IP should be banned, unless configured otherwise within a jail settings. Making this value bigger will block more aggressive attacks. A good value would be 86400 seconds (1 day). A value of -1 means a permanent ban, however this should not usually be used as a default since many end user IP addresses are dynamically assigned.
- Time interval for detection of subsequent attacks – the time window for detecting number of failures.
- Number of failures – the number of failed attempts (within the detection time interval) before an IP gets banned from the system.
After enabling fail2ban module, you can proceed to configuring particular areas of fail2ban operation.
You can choose which jails you want to enable, specify trusted IPs (helpful if for some reason your personal IPs are getting blocked), review a list of banned addresses, create your own filters and actions. By default, fail2ban ships with several Plesk oriented jails, such as SSH, FTP, Plesk Panel, mail authentication jails. It will only block intruders using iptables, and log the banned IP within the module administration area.
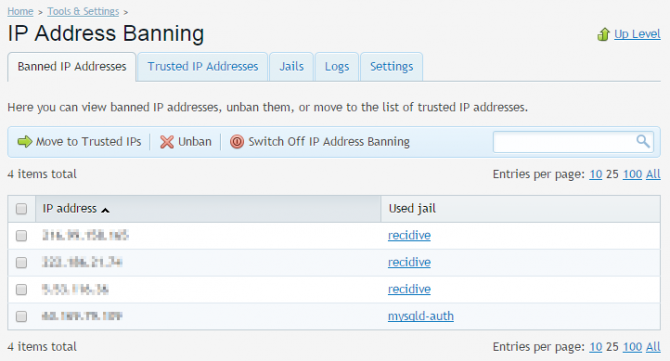
The list shows the banned IP as well as the jail it was banned against. From this menu you can control the IPs. You can either issue a one time unban action for an IP:
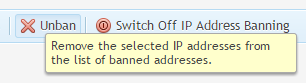
This action can be useful if you are not sure if the IP should be trusted or not. Next time the IP triggers any fail2ban jails, it will return to the banned list.
Alternatively you can move a banned IP to a trusted list, meaning that fail2ban will always allow connections from the IP even if it makes more failed authentication attempts:
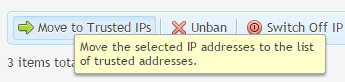
This is particularly useful if an IP is trusted by you and should not be blocked under any circumstances. The trusted IPs are listed on the Trusted IP addresses tab:
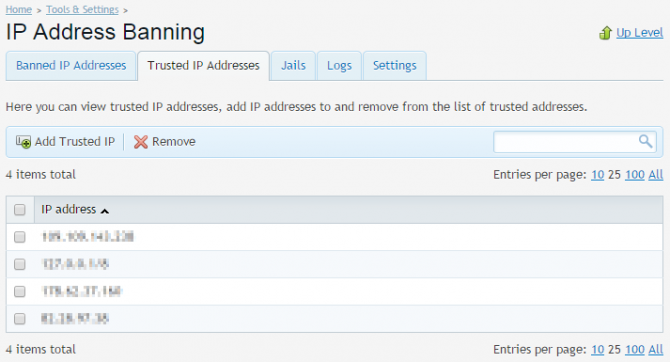
You can manually specify IPs, network ranges or hostnames that should be whitelisted by fail2ban. It is a good idea to add your own or your clients’ IP addresses here so you won’t ever lose access to Plesk.
You can also add your own jails, specify ban rules and actions depending on your needs. If you’re a Layershift customer and unsure on how to handle custom rules, or need more information on fail2ban, simply contact our support team and we will be happy to assist.
And of course if for some reason you’re not already enjoying stress-free fully managed servers from Layershift, now is the perfect time to join us – we offer free professional migration too.